Dragging and dropping with gwt-dnd

February 14th, 2008 - Written by in Using GWT

Today, we are going to take a look at adding drag-and-drop to our GWT applications. I’ve seen quite a few solutions for adding drag-and-drop, including a few tutorials that show how roll your own solution. But why reinvent the wheel when there is a perfectly good drag and drop library like ? This library by Fred Sauer provides a whole host of cool features. I took some time to play with it this past week and I will show you how to get started using the library by creating a simple shopping cart example.

To install, download the latest gwt-dnd jar file, add it to your build path and add the following line to your GWT application module file.

<inherits name='com.allen_sauer.gwt.dnd.gwt-dnd'/>

In this demo, we’re going to allow users to drop books into a shopping cart. You can take a sneak peak of what I’m going to build here. The first domain object I will create is the Book class.

()

public class Book extends Composite implements SourcesMouseEvents {
  private String title;
  private String imgUrl;
  private BigDecimal price;
  private Image bookImage;
  private VerticalPanel mainPanel;
 
  public Book(String title, BigDecimal price, String imgUrl)  {
    this.title = title;
    this.price = price;
    this.imgUrl = imgUrl;
    this.mainPanel = new VerticalPanel();
    initWidget(mainPanel);
 
    bookImage = new Image(imgUrl);
    mainPanel.setHorizontalAlignment(HasHorizontalAlignment.ALIGN_CENTER);
    mainPanel.add(bookImage);
    mainPanel.add(new Label(title));
    mainPanel.add(new Label("$"+price));
    mainPanel.addStyleName("book");
 
    public void addMouseListener(MouseListener listener) {
      bookImage.addMouseListener(listener);
   }
   ...
  }

Book is a GWT composite widget that will display the book’s title, image, and price. Notice that it implements the SourcesMouseEvents interface. This is required to make the book draggable. In my implementation, I attach a MouseListener to the image field because the GWT Image widget already implements this interface and it will allow users to use the image as a drag handle to move the book around.

Dragging is handled by implementing the DragController interface. In this demo I am extending PickupDragController, which allows me to move the books around a specified boundary panel. By default, the dragged widget will disappear when dropped on the drop target. I don’t want this behavior so I’ll use a drag proxy instead. This means I can drag a copy of the book’s image and leave the original book widget alone. To achieve this, I set setBehaviorDragProxy() to true and override PickupDragController’s newDragProxy() method.

()

PickupDragController dragController = new PickupDragController(containingPanel, false) {
  protected Widget newDragProxy(DragContext context) {
    AbsolutePanel container = new AbsolutePanel();
    DOM.setStyleAttribute(container.getElement(), "overflow", "visible");
    for (Iterator iterator = context.selectedWidgets.iterator(); iterator.hasNext();) {
      Widget widget = (Widget) iterator.next();
      Book book = (Book)widget;
      container.add(new Image(book.getImageUrl()));
    }
    return container;
  }
};

Then I make Book widgets draggable by calling makeDraggable on the drag controller. Here, we pass to the method the book object (the draggable widget) and its image (the drag handle).

()

FlowPanel flowPanel = new FlowPanel();
flowPanel.addStyleName("flowPanel");
for (int i = 0; i < books.length; i++) {
  Book book = books[i];
  dragController.makeDraggable(book, book.getImage());
  flowPanel.add(book);
}

For the drop part of the demo, I created a object which serves as the drop target. Dropping is handled by a DropController object. The library comes with several implementations, and I chose to extend the SimpleDropController class.

()

public class CartDropController extends SimpleDropController {
  private ShoppingCart cart;
 
  public CartDropController(Widget dropTarget) {
    super(dropTarget);
    cart = (ShoppingCart)dropTarget;
  }
  public void onDrop(DragContext context) {
    super.onDrop(context);
    Book book = (Book)context.draggable;
    cart.add(book);
  }
  public void onEnter(DragContext context) {
    super.onEnter(context);
    cart.addStyleName("enterCart");
  }
  public void onLeave(DragContext context) {
    super.onLeave(context);
    cart.removeStyleName("enterCart");
  }

This controller accepts a GWT widget (the drop target) in its constructor and I had to implement the behavior for the following events: onDrop, onEnter, onLeave, and onPreviewDrop. The implementations of onEnter, and onLeave are simple. Here, I just add and remove a css class which can be used to give a visual indicator when the the book gets dragged over the cart. The onDrop method is used to add the dragged book object to the shopping cart and updating its display. I don’t use onPreviewDrop here, but it can be used to cancel a drop if some requirement isn’t met by throwing a VetoDragException.

Finally, to tie it all together, we need to register the drag controller with the drop controller like so:

()

ShoppingCart cart = new ShoppingCart();
CartDropController dropController = new CartDropController(cart);
dragController.registerDropController(dropController);

This is the demo in action. Hopefully this will get you started with using the gwt-dnd library. The project page has several demos to show what the library is capable of. I’ve only just touched the surface of what can be done, and there’s a lot of functionality out of the box that you can play with. So take a look around!

14 Comments Stumble it!

How to access Web Services with GWT

February 6th, 2008 - Written by in Using GWT

There are a lot of new and interesting web services popping up on the web these days, and you may want to make use them in your GWT applications. In this short guide, I will show you how to call these public apis from within your GWT app.

The main difficulty when trying to talk to some web service on another server is getting past your web browser’s Same-Origin Policy. This basically says that you may only make calls to the same domain as the page you are on. This is good for security reasons, but inconvenient for you as a developer as it eliminates the use of GWT’s HTTP library functions to achieve what we want to do. One way to get around this is to call a web service through a javascript tag which bypasses this problem. In his book, Google Web Toolkit Applications, Ryan Dewsbury actually explains this technique in more detail and provides a class called JSONRequest which handles all the hard work for us. JSON is one of the more popular data formats, so most web services support it. Lets leverage Ryan’s code and take a quick look at how it works.

public class JSONRequest {
  public static void get(String url, JSONRequestHandler handler) {
    String callbackName = "JSONCallback"+handler.hashCode();
    get( url+callbackName, callbackName, handler );
  }   
  public static void get(String url, String callbackName, JSONRequestHandler handler ) {
    createCallbackFunction( handler, callbackName );
    addScript(url);
  }
  public static native void addScript(String url) /*-{
    var scr = document.createElement("script");
    scr.setAttribute("language", "JavaScript");
    scr.setAttribute("src", url);
    document.getElementsByTagName("body")[0].appendChild(scr);
  }-*/;
  private native static void createCallbackFunction( JSONRequestHandler obj, String callbackName)/*-{
    tmpcallback = function(j) {
      ::onRequestComplete(Lcom/google/gwt/core/client/JavaScriptObject;)(j);
    };
    eval( "window." + callbackName + "=tmpcallback" );
  }-*/;
}

To make our request we call the get method with the web service url, and an implementation of the JSONRequestHandler interface. This interface has one method called onRequestComplete(String json). This is where you’ll handle the JSON formatted data once it comes back from the server. When calling a service from within a script tag, we need to specify the name of a callback function in the request. Most services let you specify the name yourself, so the first get method generates a callback name for you. The createCallback method is a JSNI method that simply calls your JSONRequestHandler implementation when the call returns via the callback name. Note, if you use this class, to make sure and change the package name for the JSONRequestHandler call to the correct location. Finally, the get method will call the addScript function which is responsible for embedding the tag on your page and setting its src attribute to the web service url.

Now that I’ve described the technique to make the calls, you’ll need to find some APIs to use it with. When looking at an API specification, make sure it has a parameter to return results in JSON format, and that it supports a callback parameter. Here are some example web service APIs to start with.

– Get a list of my uploaded videos.

JSONRequest.get(
  "http://gdata.youtube.com/feeds/api/users/bogleg/uploads?alt=json-in-script&callback=", 
  new JSONRequestHandler() { ... });

– Get the social graph of bradfitz.com.

JSONRequest.get(
  "http://socialgraph.apis.google.com/lookup?&q=bradfitz.com&pretty=1&fme=true&callback=", 
  new JSONRequestHandler() { ... });

Digg API – Get the top stories from Digg.

JSONRequest.get(
  "http://services.digg.com/stories/top?appkey=http%3A%2F%2Fgwtsite.com&type=javascript&callback=", 
    new JSONRequestHandler() { ... });

GeoNames webservice – Get a zip-code location.

JSONRequest.get(
  "http://www.geonames.org/postalCodeLookupJSON?postalcode=94566&country=US&callback=", 
  new JSONRequestHandler() { ... });

I hope you found this short tutorial useful. If you want to learn more about GWT, make sure to .


35 Comments Stumble it!

Exploring data binding with Gwittir

January 30th, 2008 - Written by in Using GWT

is a library for GWT that provides a lot of interesting features including data binding, animation, reflection, and more. To help me learn more about this library, I decided to take it a spin and create a small GWT application to experiment with Gwittir’s data binding capabilities. So what does data binding give you? It allows you to glue together your user-interface widgets with the properties on your domain model. Whenever a user does something to a bound widget, its associated property in the model will be updated automatically. The binding is bi-directional as well, so if you make a change to the model, the widget will also update itself to reflect the change. Neat! So some of the benefits of data binding are that it promotes good MVC design, and it saves you from writing all those event listeners to copy data back and forth between UI and model.

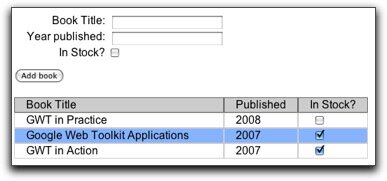
The sample application I created is this simple data entry form, which allows the adding of books to a table.

I first created a Book object to be my model. It is a simple JavaBean with three fields, title, year, and inStock and extends the AbstractModelBean class. AbstractModelBean implements the Bindable interface which allows an object to be bound by the Gwittir framework and gives us the necessary PropertyChangeSupport.

(com.gwtsite.gwittir.Book)

public class Book extends AbstractModelBean {
  private String title;
  private int year;
  private boolean inStock;
 
  public Book() {}
  public String getTitle() {
    return title;
  }
  public void setTitle(String title) {
    this.title = title;
  }
  // ... other getter and setters omitted

For the user interface, I created a composite BookForm widget to hold the input fields and a table which displays the added books. The Gwittir distribution includes several BoundWidgets (Button, TextBox, etc), which are just standard GWT widgets with some extra methods to make binding easier. To get this behavior in my BookForm widget, I extended AbstractBoundWidget. By doing this, I had to implement the getValue() and setValue() methods. For a composite widget like I’ve created, the value property is simply my Book model.

(com.gwtsite.gwittir.BookForm)

public BookForm() {
  this.setValue(new Book());
  // ...
}
public Object getValue() {
  return this.getModel();
}
public void setValue(Object value) {
  this.setModel(value);
}

Now that I have created my model and view, I need a controller to hook everything together. In Gwittir, this is called an action. For this, I created an AddBookAction class which implements the BindingAction interface. This interface has four methods, bind(), unbind(), set() and execute(). Lets look at the set() method first. The set() method gets called when our widget is initially attached to the browser window. It is responsible for doing all the dirty work and wiring up the Book properties to the widgets in our form.

The Gwittir Binding object represents the data binding between two bindable objects. It can also hold a list of child bindings which allow us to manage multiple bindings with one instance.

(com.gwtsite.gwittir.AddBookAction)

private Binding binding = new Binding();
 
public void set(BoundWidget widget) {
   BookForm bookForm = (BookForm)widget;
   Book book = (Book) bookForm.getModel();
   ...
   binding.getChildren().add(new Binding(book, "title", bookForm.titleText, "value"));

The above code demonstrates how we bind the title property of the Book object with the value property of the title TextBox of our BookForm UI widget.

Gwittir also provides support for adding validation to our bindings. I’ll demonstrate this by doing some validation on the year property. Lets say that we only allow books published after 1950 to be added to our list. To accomplish this, I created a custom Validator by implementing the Validator interface.

(com.gwtsite.gwittir.AddBookAction)

private class NewBooksOnlyValidator implements Validator
{
  public Object validate(Object value) throws ValidationException {
    String year = value.toString();
    if (new Integer(year).intValue() < 1950)
      throw new ValidationException("Must be after 1950.");
    return new Integer(year);
  }
}

Ok, so this is not truly correct code, but it will work for demonstration purposes. Now we need a way to show any validation errors. Gwittir provides a ValidationFeedback interface along with several implementations. I decided to use two implementations – the PopupValidationFeedback class which will display an error message next to the TextBox if the user enters an invalid year, and the StyleValidationFeedback class which will add a css class called validation-error which we can use to highlight any errors in red.

I can add these two implementations into a CompositeValidationFeedback object and pass it to the binding like this:

(com.gwtsite.gwittir.AddBookAction)

ValidationFeedback feedback =
        new PopupValidationFeedback(PopupValidationFeedback.RIGHT)
        .addMessage(NewBooksOnlyValidator.class, 
        "We only accept books published after the year 2000.");
CompositeValidationFeedback cvf = new CompositeValidationFeedback()
        .add(feedback)
        .add(new StyleValidationFeedback("validation-error"));
binding.getChildren().add(new Binding(book, "year", null, null, 
                                bookForm.publishedText, "value", 
                                new NewBooksOnlyValidator(), cvf));

The second method of our Action class is the bind() method. This gets called automatically after our BookForm is attached to the browser window. All it does is call bind() on our binding object and establishes the binding.

The last step is to call our Action’s execute() method. I call this from BookForm’s ‘Add book’ button.

(com.gwtsite.gwittir.BookForm)

addBookBtn.addClickListener(new ClickListener() {
  public void onClick(Widget sender) {
    if (getAction() != null) {
      getAction().execute(BookForm.this);
    }
  }
});

The execute implementation itself is actually quite simple. First it checks if the binding is valid. This will not be the case for example, if the user enters an invalid year. If the binding is valid, then we get the fully populated Book object from the form, and add it to our Table. Easy!

(com.gwtsite.gwittir.AddBookAction)

public void execute(BoundWidget widget) {
  BookForm bookForm = (BookForm)widget;
  Book book = (Book) bookForm.getModel();
  if (binding.isValid()) {
    bookForm.booksTable.add(book);
  }
}

Hopefully this small example will peak your interest in taking a closer look at what the Gwittir framework has to offer. It was created by Robert Cooper and Charlie Collins who have a new book coming out, called . So expect some cool stuff from this framework in the future.

References

17 Comments Stumble it!

« Previous Entries Next Entries »